
To disable the Java web plug-in in Safari, follow these steps:
- In Safari, choose Safari > Preferences or press Command-comma (⌘-,)
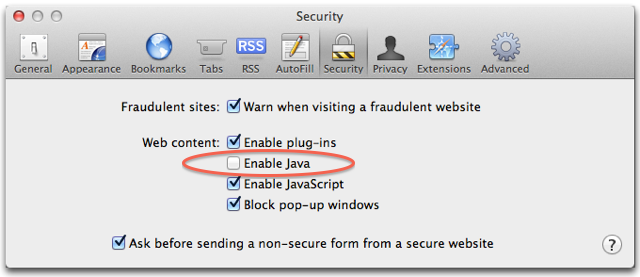
- Click “Security”.
- Uncheck (deselect) “Enable Java”.
- Close the Safari preferences window.
Additional Information
To disable the Java web plug-in in Safari, follow these steps:
Additional Information
In Lion, Dashboard has now been incorporated into Mission Control. The most striking consequence of this is that it is no longer a semi-transparent overlay that fades in over your desktop. Instead, it is now its own Space – the far left one. You can still access it by pressing the Dashboard key on your keyboard or by clicking it in your Dock, but now you can also get to it using the horizontal swipe gesture you use to slide between Spaces.
This means that Dashboard now slides in from the left of the screen when activated, and as there is nothing behind it, it has an opaque patterned background. As a result, Apple has decided to disable the fancy ripple effect that used to be shown when adding new widgets.
If you find that you can’t live without the ripple, don’t worry, you can bring it back by unticking just one checkbox. Open up System Preferences, and go to the Mission Control section.
Then simply untick the first checkbox – Show Dashboard as a Space.

This completely restores Dashboard to the way it was in Snow Leopard, including the fancy ripple effect. This also stops the horizontal swipe to activating Dashboard, but you can bring this back using other tools if you really want it.
Amongst the widgets that come with Mac OS X is the Tile Game. You shift around the tiles to reveal a picture of a snow leopard (or a leopard or a tiger, depending on your version of Mac OS X). If you play the Tile Game often, you might find the image a bit boring.
Luckily, changing the image is easy. Start by finding an image in iPhoto or the Finder to replace it. To avoid stretching, go for an image that is roughly square. Now click on the image and hold. While holding down the mouse button, press F12, or whatever key you have assigned to load up Dashboard. Now simply drag and drop your image onto the Tile Game.
 Annoyingly, the image will change back to the tiger if you close the widget. Permanently changing the image is a bit more complicated. It essentially involves replacing an image file hidden within the widget file. If you are familiar with delving into package files, this is quite straightforward.
To change this image, first we need to find the Tile Game widget. It is located in the Library folder inside Macintosh HD. Make sure you don’t accidentally go to the Library inside your user folder. Inside the Library, look for the folder called Widgets. In here you’ll find the Tile Game. To get inside the package, right-click (or Control-click) on the file, and choose “Show Package Contents” from the menu that appears.
The file we want to change is called game.png, and is located inside the Images folder. Just replace this image with your new one, making sure you give it exactly the same file nam
Normally when you download a widget and double-click it, you are presented with a dialog to install the widget. You can either cancel, and exit the installer, or click install, and the widget is moved to you widgets folder (Library/widgets).
However, in some situations you don’t want to move the widget. For instance if you are trying out a widget and don’t know if you want to keep it, or you are developing a widget and are just testing it out. To stop the widget being installed, hold down Command and Option while double-clicking it. Instead of an install button, you are presented with Run, which, funnily enough, allows you to run the widget without installing it.
Clicking this opens the widget up in dashboard, but it isn’t moved to the widgets folder, instead running it from wherever you downloaded it to.
As a result the widget won’t be in your dashboard bar, so it is a nifty trick if you want to save scrolling through loads of widgets (especially if you are a dashboard addict). This also means that once you have closed the widget, its gone for good, and you can’t open it up from within the dashboard. Of course its still sitting in your downloads folder, so a quick Command-Option-Double-Click will have it open and running again.
In the Energy Saver system preferences you will find a button labelled “Schedule.” This allows you to schedule your mac to startup and shutdown at certain times, on certain days.
This is just about the only way to schedule things without buying other software or using iCal. Basically you can set your computer to come on in the morning on weekdays and go off in the evening for example.
I combine this with a locked screen saver. In the evening I start my “Big Clock” screensaver, then put my mac to sleep. In the morning it wakes up at a specified time, and loads the password dialog box. Then, when no password is typed in, it goes to the screen saver after 30 seconds. This means when I wake up in the morning I can look over and see the time in big bright letter next to me, without them on all night to wake me up.
You can also combine this with an applescript or automator actions to play music or load web pages every morning. After writing the script to do this, set a daily alarm in iCal that loads it every morning, but make sure to make it a minute later than the time your mac wakes up from sleep.
Set as Full Screen
iCal is one of only two apps that I regularly use Lion’s full screen mode with (the other being Terminal). This allows me to leave it always running in the background, out of the way. Whenever I need to check my schedule or reminders, a simple four-fingered swipe to the left will slide the desktop across to iCal running full screen in its own space. To set iCal as full screen, just click the full screen button in the top right corner of the window. You can even combine this with the multiple calendar windows tip to allow you to swipe between multiple full screen calendars that show the current day, week and month.
Remove the leather effect
The new look and feel of iCal was one of the most controversial changes when Lion first came out, provoking outrage amongst many UI purists. If the new look isn’t for you, there are a couple of simple tweaks that will change things back to normal. First, if you just want to remove the torn page effect from the bottom of the toolbar, the Big Bucket Development blog shows you how to achieve this by replacing a single image. Alternatively, if you want to get rid of the new look completely, MacNix has a simple method that can bring back the aluminium look in both iCal and Address Book.
It’s worth making a backup of iCal before trying either method, just in case you ever want to revert back to the new leather style.
Create a quick event
iCal now has a a great new way to add events that means you no longer have to spend ages filling out dates and times with fiddly controls. Instead, just click the + button in the toolbar or press Command-N to bring up the Quick Event popover. This allows you to type in the event details in a human-readable form — for example, “Movie at 7pm on Friday” or “Meeting at 3pm until 6pm” — and iCal will interpret what you mean and create an event.

When creating events by double-clicking a day in month view, the new default behaviour is to create all-day events. If you want to create a normal event, just specify the time when typing in the event name. iCal seems to be quite flexible at interpreting what you mean – things like “Gym at 6” and “4pm Meeting” will both work.
You can also specify the length of all-day events in this way. Just type “Holiday until Saturday” or “Jim away until the 14th”.

Adjust the font size
It’s now possible to change the size of the text in the calendar view. Just choose Make Text Bigger or Make Text Smaller in the View menu or press Command-minus (-) or Command-plus (+).
Year view heat map
The new “year at a glance” view is fancy, if not altogether that useful. It allows you to see a “heat map” of how many events you have throughout the year, with busier days shown in red and quieter days show in yellow. Double-clicking any month will bring up the month view for that month.
Show more (or fewer) than seven days in week view
This is a “top sekret” feature that requires a quick trip to the Terminal before it can be accessed. Start by opening the Terminal app (located in Applications/Utilities) then paste in the following line and press return:
defaults write com.apple.iCal IncludeDebugMenu YES
Quit and re-open iCal, and you should see a new Debug menu in the menubar. In this menu, under the Top Sekret [sic] section you’ll find an option to set the number of days in week view to 7, 14, 21 or 28 days. You’ll need a pretty large screen for these options to be that useful.
It isn’t necessary to enable to debug menu to show fewer than seven days in week view. First make sure you aren’t in week view, then just hold down the Command and Option keys and them press and number between 2 and 6.
Open multiple calendar windows
This is another secret feature hidden in the debug menu (see above). Once the debug menu is enabled, it is possible to open up multiple iCal windows by selecting New Calendar Window or by pressing Command-L. This is great if you would live to have two different views open simultaneously — for example separate weeks, or a month view and a day view.

You can change the name of most files, folders, and disks in the Finder. You can’t rename your home folder (the one with your name on it).
Important: There are some things youshould not rename:
If you change the name of an installed item (such as an application) and experience problems, change the name back. If this does not help, you may need to reinstall the software.
An application is a computer program that gives you the tools to accomplish specific tasks. For example, you’re probably using the application Safari right now to read this webpage. Other applications include Mail, iTunes, Pages, TextEdit, and many more.
Accessing an application
To open an application, click the Launchpad icon in Dock or click the application’s icon in Dock (if it’s there). Depending on the application, it may display an interface window, palettes, tool bar, or other interface components, or it could display nothing at all until you open a file or create a new one.

To quit an application, choose Quit from the application menu or press Command-Q. Keep in mind that closing a window (by clicking the round, red button) will typically not quit the application.
Getting more applications
You can purchase and install applications for your Mac from App Store, which is included with OS X Lion and Mac OS X v10.6.6 and later. To start browsing software from App Store, click the App Store icon in the Dock. You can use the search field in the upper-right corner of the App Store window to search for applications.

To use App Store, you need to sign up for an Apple ID. If you already have an iTunes Store account or other Apple account, you can use that Apple ID.
Accessing files
To access your files on your Mac, you use Finder. Finder allows you to see all files and folders on your Mac and search for them using the search field in the top-right corner of the Finder window. Once you find a file you want to open, simply double-click the file, it will open in the application that supports its file format.
To close a file, just click the round, red button in the upper-left corner of its window. Keep in mind that closing a file will not necessarily quit the application too. To quit an application, choose Quit from the application menu or press Command-Q.
Folders
Folders on your Mac are used to organize your file and applications.

Your Documents folder (in the Finder sidebar under Favorites) will contain all documents that you create. The Finder sidebar includes several other folders, such as Movies, Music, and Pictures, to help keep all your files organized by type. The Applications folder contains all your applications and the Desktop folder contains all the stuff that’s currently on your desktop.
Organizing files and folders
If you want to add more folders to set up an organizational scheme, here’s how to create a new folder:
Or, you can simply press the Shift-Command-N key combination.
To organize your files and folders, drag any file, folder, or application that you want into your new folder, or drag the folder into any other folder to establish an organized hierarchy.
OS X Mountain Lion is Apple’s latest Mac operating system that is complete with a bunch of new features that iOS users will find familiar. It’s looking like a great addition to the Mac OS family, but for the time being it’s still in Developer Preview, has a fair amount of bugs, and isn’t quite ready for prime time. For those who want to explore and develop for OS X Mountain Lion without losing their primary – and stable – OS X Lion installation, the best thing to do is create a dual boot set up. This lets you have both Mac OS X 10.7 and OS X 10.8 on the same Mac, which you can easily switch between with a reboot.
Before beginning, do the following:
If you already made an OS X Mountain Lion boot installer, you can use that, or you can partition directly from Disk Utility in Lion. It shouldn’t matter although OS X Lion can be pickier with partitioning the boot drive than prior versions of Mac OS X. After you have backed up your Mac, you can proceed.
Set Up Dual Boot for OS X Lion & Install OS X Mountain Lion
We’ll walk through partitioning, installing, and booting either version of Mac OS X:


You’re done! After installation is complete, you will be greeted by the familiar OS X welcome and set up screen.
Choosing which OS X version to boot
Hold down Option during reboot to bring up the boot loader. You’ll find four drives; one for OS X 10.7, one for OS X 10.8, and a recovery partition for each OS X version. This is why it was important to name the OS X Mountain Lion partition something obvious.
Select “Mountain Lion” and boot as usual. Boot disk settings can also be adjusted through System Preferences’s Startup Disk panel at any point in either Mac OS X 10.7 or OS X 10.8.
Competing Recovery Partitions
Having two active recovery partitions can cause issues if you attempt to restore from one or the other, and it’s recommended to not use either to restore the OS in the current dual boot setup. If you are going to remove either the OS X Lion or OS X Mountain Lion partitions, don’t forget to remove the Recovery partition accompanying that version of Mac OS X. If not, you could inadvertently restore the wrong OS, or encounter boot problems if you delete the wrong OS and find the recovery partition to be incompatible with the remaining version of OS X.
Note about partitioning in OS X 10.7
OS X Lion is pickier than past versions of Mac OS X when partitioning the boot drive. If you run into problems partitioning the active boot drive, reboot into Recovery Mode (Command+R at boot) and use Disk Utility from there to create the partition, then reboot again into OS X Lion and continue with installation.

Mac OS X 10.7 and later include the Versions feature and Auto-Save ability, this lets users restore back to previous editions of a file by creating a constant sequence of saved file states while they are being worked on. All around, Versions and auto-save are useful, but they can also leave traces of sensitive documents and files you may not wish to keep around. Other than the privacy implications, this same technique can resolve some erroneous behavior with Versions as well. The simplest solution to these issues is to manually delete the Versions saved states cache directory.
The Versions cache directory is stored within the root of a Mac OS X installation here:
The safest way to remove this folder will be multiple steps, so launch the Terminal (/Applications/Utilities/) and type the following:
To be certain you’re about to remove the proper directory, verify the directory name:
Delete the directory and its contents with rm:
Doing this one-time will not disable the feature, it will just remove all existing history of files that have been managed by Versions.
After a file has been processed automatically by Versions again, the directory will be rebuilt. Because this is involves editing system files and using the potentially catastrophic ‘rm -rf’ command, you shouldn’t use this tip unless you know what you’re doing and why you’re doing it.
Also, be aware that deleting the directory can cause some temporary issues with existing files that are locked or have saved states, even if file locking is turned off. Typically this will be in the form of an error message when using the file the first time, but it shouldn’t cause any serious issues.
