Switching Windows to Mac

Installing applications

For most applications on OS X there’s no installation process like on Windows. When you want to install an application on Windows, you have to run an installer that will install it for you.

On OS X you can download an application from the Mac App Store or download a .dmg file from Internet and just drag it to your Applications folder. And that’s it. No installing. You are switching to another Mac? No problem, Apple iCloud will help you switch over without pain.

OS X offers plenty of productivity raising features without installing any third party application. However, we use apps like Alfred to extend OS X features even more.

Using the keyboard

Getting familiar with keyboard shortcuts is essential to becoming more productive. OS X offers many shortcuts by default. You can browse through them in System Preferences > Keyboard > Shortcuts.

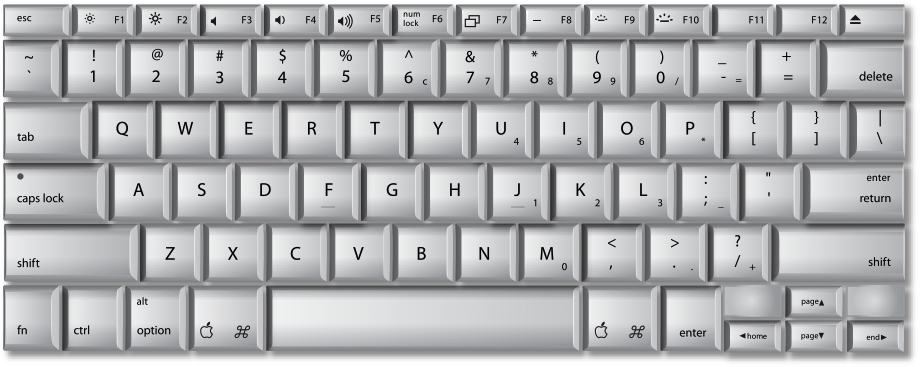
CMD is the magic key you’ll use for most of the shortcuts and commands. ALT (⌥) button is also often called option key.

Useful shortcuts to remember:

  • cmd + tab – Move focus to next application
  • cmd + ` – Move focus to next window
  • ctrl + tab – Move focus to next tab
  • cmd + w – Close tab
  • cmd + q – Close application
  • cmd + , – Open preferences of active application

Finder file manager

Finder is OS X’s default file manager. It’s similar to Windows Explorer but with some differences. For example, there’s no classic Cut option which I really missed. If you want to Cut something like on Windows, you have to select the file, press cmd + C and then cmd + alt + V where you want to paste it.

SHORTCUT KEYS

Here are also some useful shortcuts to remember:

  • cmd + ↑ – Up to higher folder (in the folder structure)
  • cmd + ↓ or cmd + O– Open file or folder
  • cmd + backspace – Delete selected item
  • enter – Rename selected item

HIDDEN FILES

In case you want to be able to see hidden files in the Finder, paste this line into your Terminal.app (works for OS X 10.7 and above):

defaults write com.apple.finder AppleShowAllFiles TRUE

Apply changes by holding ALT key and press right click on Finder icon and select Relaunch.

If you just need to see hidden files in the Open/Save dialogs, press cmd + shift + . to display them temporarily.

Navigation in text documents

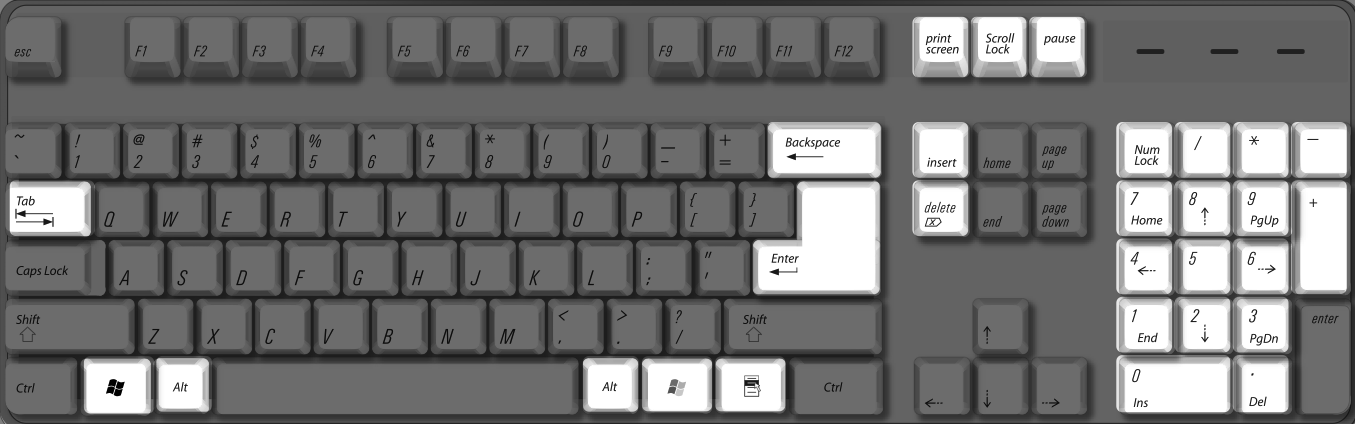
Getting familiar with the text manipulation is especially useful for developers. There are noHOME and END buttons on most Mac keyboards. But, there’s an alternative – CMD + left/right.

  • cmd + shift + ↑/↓ – Select a whole document from the cursor position in a desired direction
  • cmd + shift + ←/→ – Select a line to the left or right
  • alt + shift + ←/→ – Select a word left or right from the cursor position

If you ditch shift from shortcuts above, your cursor will be moved without selecting text.

Window management

Windows comes with a Snap feature. It’s a way of resizing windows by dragging them to the edges of the screen after what they automatically cover screen halves. That’s the only feature that was missing on Mac. That is, until we met Spectacle. Spectacle is a simple OS X application which lets you reorder open windows with keyboard shortcuts, even without using your mouse.

  • cmd + alt + ← – snap window to the left edge of the screen
  • cmd + alt + → – snap window to the right edge of the screen

Alfred app

Alfred is a substitute for native OS X Spotlight application. It’s a tool that saves you time when opening new apps or searching local computer or web. It can also be used as a calculator and has a bunch of other features.

To find and start an application just enter the application name and press enter. Alfred is super-fast for searching documents. Just type keyword find before name of the document you are trying to open in Finder. Use open if you want to open a file.

Alfred example 1

Start an application

Alfred example 2

Finding a file

Alfred example 3

Using Alfred as a calculator

Mouse and Trackpad

Magic Mouse is awesome. However, there’s a trick – the whole surface of the Magic Mouse is scrollable, you just need to swipe your fingers over it. It also offers some great gestures inSystem Preferences > Mouse > More Gestures.

Magic Mouse gestures

Magic Mouse gestures

RIGHT CLICK

By default, the Magic Mouse and Trackpad come with the right-click option turned OFF. I recommend turning it ON in the Mouse preferences/Trackpad preferences section of the System preferences panel.

Screenshots & screencasts

OS X comes with a lot of built-in features. Taking screenshots is one of them. Without having to install any application, you can easily save a screen or a desired screen area. Of course, it’s possible to do this on Windows as well, but the whole process is simpler on OS X.

  • cmd + shift + 3 – Saves whole screen
  • cmd + shift + 4 – Saves user selected part of the screen
  • cmd + shift + 5 – If you use Skitch – selects part of the screen and opens it in Skitch ready for editing

RECORDING SCREENCASTS

Easy way to record screencast is by using the QuickTime Player application and selecting File > New screen recording. Of course, you can choose to record the whole screen or just a part of it.

Migrate Windows Files

You don’t have to start your Mac life from scratch. You can transfer over many of your PC files and use them just like you have before.

migration image

You can easily move your Windows files to your new Mac and use them with Mac applications. Macs can open many different kinds of files from your PC, as long as you have appropriate software installed that can interpret them.

For example, you can move all of your Microsoft Office documents to your Mac if you have Microsoft Office for Mac OS X installed. Office functions almost exactly the same on a Mac as it does on a PC. Also, iWork applications (Pages, Numbers, and Keynote) can use and export many Microsoft Office file types.

Audio files (AIFF, MP3, WAV) open in iTunes or QuickTime Player. Image files (JPEG, PDF, TIFF, GIF, RAW, and the like) can be opened with iPhoto and Preview. QuickTime Player can be used to watch many types of movie files.

If you’re unsure if there’s a Mac version of your favorite Windows app or an app that opens certain types of files, check out Apple Downloads, the Mac App Store or your local Apple Store or Mac retailer.

Use Migration Assistant

When you’re ready to move your PC files to your Mac, Migration Assistant helps you easily transfer them. You can transfer your whole Windows user account—including your pictures, music, and files.

When you log in to your transferred user account, you’ll find your information just where you’d expect it to be:

  • Your contacts are in Contacts.
  • Your web browser’s bookmarks, favorites, and homepage are set up in Safari.
  • Your calendar accounts, which include your meetings and events, are set up in Calendar.
  • Your email accounts, which include your email messages and attachments, are set up in Mail.
  • Your custom desktop picture from your PC is set as your desktop picture (unless it is a trademarked Microsoft picture).
  • Your iPhone, iPad, and iPod touch apps you bought in iTunes on your PC are in iTunes on your Mac. If your music was in iTunes on your PC, your music is also on iTunes on your Mac.
  • Your files from My Documents (Documents), My Videos (Videos), My Music (Music), or My Pictures (Pictures) folders are in the Documents, Movies, Music, or Pictures folders in Finder.
  • Your files from the PC’s desktop are now on your Mac’s desktop.

Transfer information from your PC over your wired or wireless network

To move files using Migration Assistant to your Mac from your PC, use these steps.

  1. On your PC, Download Windows Migration Assistant , then open it.
  2. Make sure both computers are turned on and connected to your wired or wireless network. If needed, you can use a single ethernet cable to create a simple network between the two computers.
  3. Click Continue on the PC.
  4. On your Mac, open Migration Assistant by clicking Launchpad in the Dock, and typing Migration Assistant in the search field.
  5. When you’re asked how you want to transfer your information, choose  “From another Mac, PC, Time Machine backup, or other disk”.
  6. Click Continue on your Mac.
  7. When prompted, enter your name and password.
  8. Click Continue to quit other applications. Other applications can’t be open on your Mac during the transfer.
  9. Select “From another Mac or PC”.
  10. Click Continue.
  11. Once your PC appears in the Migration Assistant window of your Mac, click Continue.
  12. On your PC you should see the passcode that was displayed on the Mac. Click Continue.
  13. On your Mac, select the information you want to transfer to your Mac, then click Continue.

If you transferred a user account from your Windows PC to your Mac, you can log into the account on your Mac.Note: When you first log into this account on your Mac, OS X prompts you to enter a new password for any user accounts that were migrated.

Manually migrating

If you prefer to move your files one by one between a Mac and a PC, consider the following options. Some are easier than others, and some require more computer experience, equipment, or resources.

Generally, you can migrate your files to the Mac by:

  • Copying the files from your PC onto external or removable storage media and then use that media in your Mac to transfer the files to your hard drive.
  • Sending files over the Internet. If you have an email account, just send the files to yourself from the PC and then pick the mail up on your Mac and save the attached files to your Mac hard drive. You may want to compress larger groups of files first.
  • Connecting the Mac and PC together through a network to use file sharing to move the files.

Tip: If you’re moving files over manually, you’ll save yourself some time down the road if you organize your files during the process from the get-go. For example:

  • Move your PC My Pictures photos to your Mac’s Home folder Pictures folder
  • Move your PC My Music song files to the Music folder on your Mac
  • Move your PC My Videos files to the Movies folder on your Mac
  • Move PC text and PDF files to your Mac Documents folder
  • Export PC contacts to vCards, and import them into your Mac Contacts

Use external or removable media

If both your Mac and PC have a CD or DVD drive, or a USB port:

  • Copy the files from the PC to an external hard drive or storage device, then reconnect the drive to your Mac and transfer the files to your Mac hard drive.
  • Burn files to a CD or DVD on your PC, and then use the discs in your Mac to transfer the files to your Mac hard drive.
  • If you don’t have many files, transfer them over email, create zip files for larger groups of files. Mail your files from the PC to yourself, and then pick them up using Mail on the Mac.

Use a network connection

Connect your old PC to your Mac—either directly or over a network. Before you start moving files over, you should install any Mac software that is needed to open the files. Once you’re done, use one of the following migration methods:

To move files by connecting your Mac directly to your PC (if both have an Ethernet port):

  1. Connect your Mac to your PC using a standard Ethernet cable.
  2. Make sure that both computers are turned on.
  3. In the Finder on your Mac, choose Connect to Server from the Go menu to open the window.
  4. Type your PC’s network address in the Server Address text box using one of these formats:
    • smb://DNSname/ShareName
    • smb://IPaddress/ShareName
  5. Click Connect.
  6. Follow the onscreen instructions to enter your PC’s workgroup name, user name, password, and the volume or folder you wish to access.
  7. Your PC volume should appear in the Shared section of your Finder window on your Mac.
  8. Open the volume and drag and drop files directly from it to anywhere on your Mac.
  9. When finished, click the eject button to right of your PC volume to unmount it.

To move files by connecting your Mac to your PC on the same network:

  1. Make sure that both computers are turned on and connected to the Internet.
  2. In the Finder on your Mac, choose Connect to Server from the Go menu to open the window.
  3. Type your PC’s network address in the Server Address text box using this format:smb://ServerName/ShareName, or select the name of your PC in this window (if it appears).
  4. Click Connect.
  5. Enter your PC’s workgroup name, your user name, and your password when prompted, then select the volume or folder you wish to access.
  6. Your PC volume should appear in the Shared section of your Finder window on your Mac.
  7. Open the volume and drag and drop files directly from it to anywhere on your Mac.
  8. When finished, click the eject button to right of your PC volume to unmount it.

Alternative methods

  • Copy files to a shared file server.
  • Purchase PC Data Transfer service at your local Apple retail store.

Migrate your Windows files or system to your Mac

You don’t have to start your Mac life from scratch—you can transfer over many
of your PC files and use them just like you have before

You can easily move your Windows files to your new Mac and use them with Mac applications. Macs can open many different kinds of files from your PC, as long as you have appropriate software installed that can interpret them.

For example, you can move all of your Microsoft Office documents to your Mac if you have Microsoft Office for Mac OS X installed—Office functions almost exactly the same on a Mac as it does on a PC. Likewise, you can move any Photoshop (.psd) file to your Mac and open it as long as you have Adobe Photoshop (or Photoshop Elements) for Mac installed (Photoshop has many of the same interface on both platforms). Ditto for your Quicken, FileMaker Pro, Macromedia Studio, QuarkXPress, QuickBooks, and other application files; if you have a Mac version of the software, you can open your old PC files.

For audio files (MP3, WAV, AAC QuickTime, AIFF, and so on), image files (JPEG, PDF, TIFF, GIF, RAW, and the like), or movie files (MPEG-4, DV, Flash, AVI, QuickTime, and more), you can move practically all of them to your Mac. You can use iTunes or QuickTime Player (included with your Mac) to play almost any audio file, iPhoto or Preview to view practically any image file, and QuickTime Player to watch most movie files.

If you’re unsure that a manufacturer makes a Mac version of your Windows software, you can either visit the manufacturer’s website or check out Apple Downloads, Apple Store, or App Store to see numerous products made for Mac. Check your PC software install discs too—some manufacturers release both Mac and Windows versions of the software in the same package.

Using Migration Assistant
Migration Assistant helps you easily transfer your file from your PC or Mac to another Mac. You can transfer your user account—including all of your pictures, music, and files.

When you log in to your transferred user account, you’ll find your information just where you’d expect it to be:

  1. Your custom desktop picture from your PC is set as your desktop picture.
  2. Your email accounts, which include your email messages and attachments, are set up in Mail.
  3. Your contacts are in Address Book.
  4. Your calendar accounts, which include your meetings and events, are set up in iCal.
  5. Your web browser’s bookmarks, favorites, and homepage are setup in Safari.
  6. Your iPhone or iPod touch applications you bought in iTunes on your PC are in iTunes on your Mac. If your music was in iTunes on your PC, your music is also on iTunes on your Mac.
  7. Your Files from My Documents (Documents), My Videos (Videos), My Music (Music), or My Pictures (Pictures) folders are in the Documents, Movies, Music, or Pictures folders in Finder.
  8. Your Files from the PC’s desktop are on your Mac’s desktop.

Transfer information from your PC over your wired or wireless network
To move files using Migration Assistant to your Mac from your PC on the same network.

  1. Make sure both computers are turned on and connected to your network.
  2. Open Migration Assistant on your PC. If you don’t have Windows Migration Assistant on your PC, you can download if from the Apple website and install it.
  3. Click Continue.
  4. On your Mac, Open Migration Assistant (located in Applications/Utilities/).
  5. When you’re asked how you want to transfer your information,choose “From another Mac, PC, Time Machine backup, or other disk”.
  6. Click Continue.
  7. When prompted, enter your name and password.
  8. Select “From another Mac or PC”.
  9. Click Continue.
  10. When prompted, click Continue to quit other applications. Other applications can’t be open on your Mac during the transfer.
  11. Select your PC, then wait for the PC to show the passcode displayed on your Mac.
  12. On your PC you should see the passcode that was displayed on the Mac, then click Continue.
  13. Select the information you want to transfer to your Mac, then click Continue.

If you transferred an user account from your Windows PC to your Mac, you can log into the account on your Mac.

Note: When you first log in, you are prompted to enter a new password for the user account.

Manually migrating
if you prefer to move your files one by one between a Mac and a PC, consider the following options. Some are easier than others, and some require more computer experience, equipment, or resources.

Generally, you can migrate your files to the Mac by:

  1. Copying the files from your PC onto external or removable storage media and then use that media in your Mac to transfer the files to your hard drive.
  2. Sending files over the Internet. If you have an email account, just send the files to yourself from the PC and then pick the mail up on your Mac and save the attached files to your Mac hard drive. You may want to zip larger groups of files first.
  3. Connecting the Mac and PC together through a network to use file sharing to move the files.

Tip: If you’re moving files over manually, you’ll save yourself some time down the road if you organize your files during the process from the get-go. For example,

  1. move your PC My Pictures photos to your Mac’s Home folder Pictures folder
  2. move your PC My Music song files to the Music folder on your Mac
  3. move your PC My Videos files to the Movies folder on your Mac
  4. move PC text and PDF files to your Mac Documents folder
  5. export PC contacts to vCards, and import them into your Mac Address Book…and so on.

Use external or removable media
If your Windows computer has a CD or DVD drive, or a USB port:

  1. Copy the files from the PC to an external hard drive or storage device, then reconnect the drive to your Mac and transfer the files to your Mac hard drive.
  2. Burn files to a CD or DVD on your PC, and then use the discs in your Mac to transfer the files to your Mac hard drive.
  3. If you don’t have many files, transfer them over email, create zip files for larger groups of files. Mail your files from the PC to yourself, and then pick them up using Mail on the Mac.

Use a network connection
Connect your old PC to your Mac—either directly or over a network. Before you start moving files over, you should install any Mac software that is needed to open the files. Once you’re done, use one of the following migration methods.

Direct connect
To move files by connecting your Mac directly to your PC, if both have an Ethernet port:

  1. Connect your Mac to your PC using a standard Ethernet cable.
  2. Make sure that both computers are turned on.
  3. In the Finder on your Mac, choose Connect to Server from the Go menu to open the window.
  4. Type your PC’s network address in the Server Address text box using one of these formats: smb://DNSname/ShareName or smb://IPaddress/ShareName
  5. Click Connect.
  6. Follow the onscreen instructions to enter your PC’s workgroup name, user name, password, and the volume or folder you wish to access.
  7. Your PC volume should appear on your Mac Desktop.
  8. Open the volume and drag and drop files directly from it to anywhere on your Mac.
  9. When finished, drag your PC volume to the Trash to unmount it.

Network connection
To move files by connecting your Mac to your PC on the same network:

  1. Make sure that both computers are turned on and connected to the Internet.
  2. In the Finder on your Mac, choose Connect to Server from the Go menu to open the window.
  3. Type your PC’s network address in the Server Address text box using this format: smb://ServerName/ShareName , or select the name of your PC in this window (if it appears).
  4. Click Connect.
  5. Enter your PC’s workgroup name, your user name, and your password when prompted, then select the volume or folder you wish to access.
  6. Your PC volume should appear on your Mac Desktop.
  7. Open the volume and drag and drop files directly from it to anywhere on your Mac.
  8. When finished, drag your PC volume to the Trash to unmount it.

For easier moving, you might want to consider Move2Mac, a third-party application that makes the moving process easier. Not only will it move files from your PC to your Mac, it also transfers other items such as your email account settings and address book, Internet Explorer bookmarks, desktop backgrounds, dial-up Internet settings, and more.

Alternative methods
Copy files to a shared file server.
Purchase PC Data Transfer service at your local Apple retail store.

MacBook Pro built-in keyboard mapping in Windows

MacBook built-in keyboards are similar to MacBook Pro built-in keyboards, but there are some differences (such as Keyboard Illumination keys, which are not on a MacBook keyboard). However, the majority of this article applies to MacBook keyboards as well.

MacBook Pro keyboard all keys
Sample MacBook Pro built-in keyboard

Key mappings for Microsoft Windows features 

Below is a chart of keyboard functions specific to Microsoft Windows, and equivalent key combinations as they are mapped to Apple keyboards by the Apple Keyboard Support driver.
 
PC keyboard all keys

Function PC keyboard MacBook Pro built-in keyboard

Print Screen PC Print Screen key Mac fn (function) keyMac Shift keyMac F11 key
Print active window Mac fn (function) keyMac Shift keyMac Option keyMac F11 key
Scroll Lock PC Scroll Lock key  Mac fn (function) keyMac Shift keyMac F12 key
Pause/Break PC Pause key  —
Backspace delete PC Backspace key  Mac delete key
Insert PC Insert key  —
Number lock PC numlock key Mac fn (function) keyMac F6 num lock key
Alt (Option) PC Alt key  Mac Option key
Enter PC Enter key Mac Return key 
AltGr / Alt GR PC Alt key

(Right Alt key)

 Mac Option keyMac Control key
Forward delete PC forward delete key  Mac fn (function) keyMac delete key
Applications PC applications key
Windows logo (Start menu) PC period delete keypad key Mac Command key 
Key mappings for Boot Camp features
Some keys are only available on a keyboard designed for Apple computers. They are either named differently or simply not available on a Windows-compatible keyboard.

Your Apple keyboard provides certain keys that are not available on Windows/PC keyboards.

MacBook keyboard all keys shown and certain ones highlighted

Function PC keyboard MacBook Pro built-in keyboard
Brightness down Mac F1 key 
Brightness up  Mac F2 key
Volume down  Mac F4 key
Volume up  Mac F5 key
Mute  Mac F3 key
Media eject  Mac eject key
Media eject secondary optical drive Mac Option key Mac eject key
Delete  Mac delete key
Fn (Function)  Mac fn (function) key
Display Mode Toggle  Mac F7 key
Keyboard Illumination Toggle (MacBook Pro)  Mac F6 key
Decrease Keyboard Illumination  Mac F9 key
Increase Keyboard Illumination  Mac F10 key

Numeric keypad mappings
Apple external and built-in keyboards provide the same functionality as Microsoft-compatible numeric keypads.

To enable numerical input, press Num Lock on a PC keyboard, or Fn-Numlock on the MacBook Pro keyboard.

The chart below shows equivalent keystrokes.

Function PC keyboard MacBook Pro built-in keyboard
Page Up PC 2 keypad Mac fn (function) keyMac Page Up key

(Numlock off)

Page Down PC 3 keypad Mac fn (function) keyMac Page Down key

(Numlock off)

Insert PC zero keypad  —
Decimal Point PC period delete keypad Mac decimal point key

(Numlock off)

Delete PC period delete keypad Mac fn (function) keyMac decimal point key

(Numlock off)

Up arrow PC 8 keypad  Mac page up key

(Numlock off)

Down arrow PC 2 keypad  Mac page down key

(Numlock off)

Left arrow PC 4 keypad  Mac left arrow key

(Numlock off)

Right arrow PC 6 keypad Mac right arrow key

(Numlock off)

Home PC Home keypad Mac fn (function) keyMac left arrow key

(Numlock off)

Additional Information
If you disable the Apple Keyboard Support driver in Windows, Windows will not recognize extended Function keys, nor the (Fn) key.

Important: Apple does not provide technical phone support for installing, using, or recovering Microsoft Windows. Support is available for using Boot Camp Setup Assistant, as well as installing or restoring Boot Camp software while booted into Windows. Support articles and discussions may also be available on Apple’s support website.